
Install retractable or magnetic screens with a fine mesh (≥20×20; 30×30 in midge areas) into the interior reveal of tilt-and-turn or outward-opening Euro windows. Seal gaps and fix tears for a subtle, effective barrier.
You didn’t buy those Euro windows for the clean lines, wall-to-wall glass and to entertain mosquitoes at dusk. The problem? Many tilt-and-turn and outward-opening window models do not include screens, and bulky add-ons can detract from the clean, minimalist look. The solution is stunningly simple. Everything to select the right retractable or magnetic screen, select a mesh size that kills your bugs and install it where you won’t see it when it’s not in use. In this guide, you’ll discover exactly what makes for great Euro-style framing and how to achieve a designer-clear view with no bugs.
Why Mosquitoes Get In (and How to Stop Each Cause)

One of the most common ways bugs enter is through small openings, holes or coarse screen mesh, while at the same time it enables better air flow for absorbing light and is more energy-saving. Here’s a closer look at why:
1) Gaps & unsealed frames
Even a sash, corners or hardware with a 1–2 mm gap around is sufficient for mosquitoes to enter. Begin with a night “light test” to identify leak lines; then apply EPDM or foam weatherstripping on contact surfaces, brush seals where parts slide past each other and tighten sash locks so the seals compress as they should. Shim hinge plates or adjust strike plates if the frame is out of square to ensure even contact. Apply a thin line of silicone to static hairline cracks.
2) Torn or loose mesh
Small snags become big ones very quickly with daily opening and cleaning. Examine the mesh corners and mid-span for any sag. Replace holes with screen patches or clear repair tape (also known as resplining) to ensure the mesh is tight and centered in its groove for loose panels. In homes with pets/children, you may want to upgrade the bottom 1/3 of the screen to stainless or PET-resistant mesh so that claws don’t damage the material. Additionally, you may want to consider a low kick panel on those to absorb scuffs instead of the mesh.
3) Mesh too coarse
18×16 mesh is the standard and it will stop many insects, but may be less effective on smaller ones. When you want to keep mosquitoes at bay, opt for a 20×20 (they work reliably); for midges/no-see-ums, choose a 30×30. Spiders, just like any other filter, have a finer mesh will have a little less air flow and the light might not be as bright. Counterbalance this by keeping the panel area large and pairing the window with a fan, if necessary. If you value clarity, seek out “invisible” polyester or thin-filament PET meshes that maintain a clearer view at the same density.
4) Light & airflow attract bugs
Warm air streaming out and hot bulbs immediately at the opening provide a beacon. Reposition lamps farther from the window line, use warmer color temperature bulbs in the evening and get a gentle cross-breeze that moves air out across your screen with a floor or clip fan. Put sheer curtains in an almost-closed position at dusk to reduce visual pull without compromising ventilation, and avoid setting up bug traps directly next to the window. Note that this will lure bugs toward the opening.
Screen & Net Options for a Clean, Euro Look (At a Glance)
| Type | Works With | Pros | Cons | Best For |
| Retractable (roller cassette) | Tilt-and-turn, casement | Discreet, hides away, preserves view | Higher cost; needs level install | Premium look, daily use |
| Magnetic clip-on | Casement/awning (outward), rentals | No drilling, removable, quick fit | Adhesive/magnets can loosen over time | Renters, fast DIY |
| Clip-in frame | Tilt-and-turn | Drill-free, tidy fit in reveal | Must match frame profile | Newer Euro frames |
| Pleated screen | Wide spans/sliders | Smooth lateral action | Tracks need cleaning | Large openings/balconies |
| Fixed frame | Inward-opening | Durable, tight seal | Precise sizing; likely drilling | Long-term installs |
| Velcro/adhesive net | Any flat reveal | Lowest cost, fastest install | Least durable and least sleek | Seasonal/temporary use |
How to Screen Windows that Open Outwards?

Outward-opening sashes require an inside-mounted solution that clears handles and allows for hinge swing. Three reliable approaches are magnetic frames, hinged internal frames, and retractable cassettes, all designed to maintain a clean look while sealing every gap.
1) Magnetic Frame (No-Drill)
Want a renter-friendly, fast install that still looks tidy? A magnetic frame snaps on/off for cleaning, keeping the sash hardware fully usable.
- Measure the interior reveal in three places; use the smallest numbers.
- Clean and degrease the surface for a strong adhesive bond.
- Apply steel strips to the frame and magnetic strips to the screen frame.
- Build the frame, ensuring the spline mesh is taut, and square the corners.
- Add brush seals near handles/hinges to close micro-gaps.
- Click the frame on and do a night light test; re-press any loose spots.
2) Hinged Internal Frame (Swing-Open Access)
Prefer something sturdier that still opens for glass cleaning? A slim, hinged frame provides a durable seal with easy access.
- Cut rails, assemble a slim aluminum frame, and spline mesh evenly.
- Dry-fit in the reveal and mark hinge positions for a rub-free swing.
- Mount mini surface hinges to the reveal (or sub-frame) and test swing.
- Install a magnetic catch/latch so the frame closes flush and tight.
- Run brush seals along the closing edge and around hardware pass-throughs.
- Seal static hairline gaps with silicone and confirm with a night light test.
3) Retractable Cassette (Discreet, Designer Look)
Want the cleanest lines and a screen that disappears when not in use? A retractable cassette keeps views clear and operation effortless.
- Select either top-down or side-pull orientation based on the handle location and sash arc.
- Dry-fit cassette and rails are perfectly level to prevent racking.
- Trim the rails as needed, deburr the ends, and align everything to be square.
- Mount the cassette with anchors or kit adhesive; tighten after alignment.
- Thread the mesh and set the spring tension exactly as instructed.
- Add brush seals at the sill/jamb, cycle the system several times, and then perform a night-light test for leaks.
Tilt-and-Turn European Style Windows: What Works
Tilt-and-turn windows tilt in for gentle ventilation and swing in (like a door) for full opening. If you add any screen, it has to live within the reveal so that the sash can still tilt and turn freely, while ensuring there’s a snug seal around the hardware and maintaining minimal lines.
Retractable (roller) or pleated
Retractable cassettes are installed at the head or jamb and roll down/across whenever you need air, so your line-free frame stays clean during all other times. Pleated units slide sideways with a shallow stack, accommodating wider openings. Opt for the 20×20 mesh mosquito net or the finer 30×30 mesh for midges and insects, plus an “invisible” polyester/PET screen to maintain a better view. Keep the rails level and square to prevent rubbing when tilting. Add weep seals (brushes) at the sill/jamb to terminate micro gaps and perform a quick night-light test to verify an air-tight fit.
Clip-in frames
Snap-in clip-ins fit into the reveal and are held in place with spring clips mated to the tilt-and-turn profiles, eliminating the need for drilling. Measure in several places and order to the smallest dimension for a tight fit that still allows full tilt and turn operation. Screens are available in 20×20 or 30×30 mesh. If pets or kids will have access to the screen, you may want to opt for pet Mosquito prevention resistant materials on the bottom section of your screen. The frames easily fold down for convenient cleaning and seasonal storage.
Magnetic kits
Magnetic screens, which utilize lightweight frames with magnetized steel tape to enable the panels to snap on and off quickly. This feature is perfect for rentals, fragile surfaces, or hard-to-wrap profiles. Degas the reveal and use adhesive to set strips. Spline mesh tightly to eliminate sag, and add brush seals in handle areas for bypass. Always verify clearance with both modes: tilt and turn. Adhesive may need to be refreshed seasonally in high heat or humidity, but replacements are fast and inexpensive.
Buying Guide: Pick the Best Mosquito Screen for Euro-Style Windows

Not sure which product is best for your window, fashion lifestyle, or budget? Follow this quick guide to find the optimal combination of look, durability, and installation method for your needs, all without compromising the clean Euro aesthetic.
Cleanest, Most Invisible Look
Opt for a (vertical pull-down or side-to-side) retractable cassette that is ‘invisible’ with polyester/PET mesh. When it’s not in use, it disappears out of sight, maintains sleek sightlines and keeps the view clear while still repulsing bugs.
No-Drill or Renting
Choose magnetic or clip-in kits that fasten to the interior reveal, allowing for easy removal without damage. Perfect for leases and sensitive finishes, but still allows full tilt/turn when fitted correctly.
Pets or Kids
Choose stainless or PET-resistant mesh on the bottom to fend off claws and knocks. Include a low kick panel for extended longevity and keep the upper field open for optimal visibility.
Tiny Midges in Your Area
Choose 30×30 “no-see-um” mesh to keep biting insects such as midges and sandflies away from your face. Assuming a slight trade-off between airflow and brightness, connecting to a low-speed fan may help you work more efficiently.
Budget and Speed
A Velcro + polyester net option that takes the least amount of time and is the lowest in cost. It’s ideal for occasional, temporary use but keep in mind the shorter lifespan and less polished look compared to framed or retractable models.
How-To Install a Retractable Fly Screen?
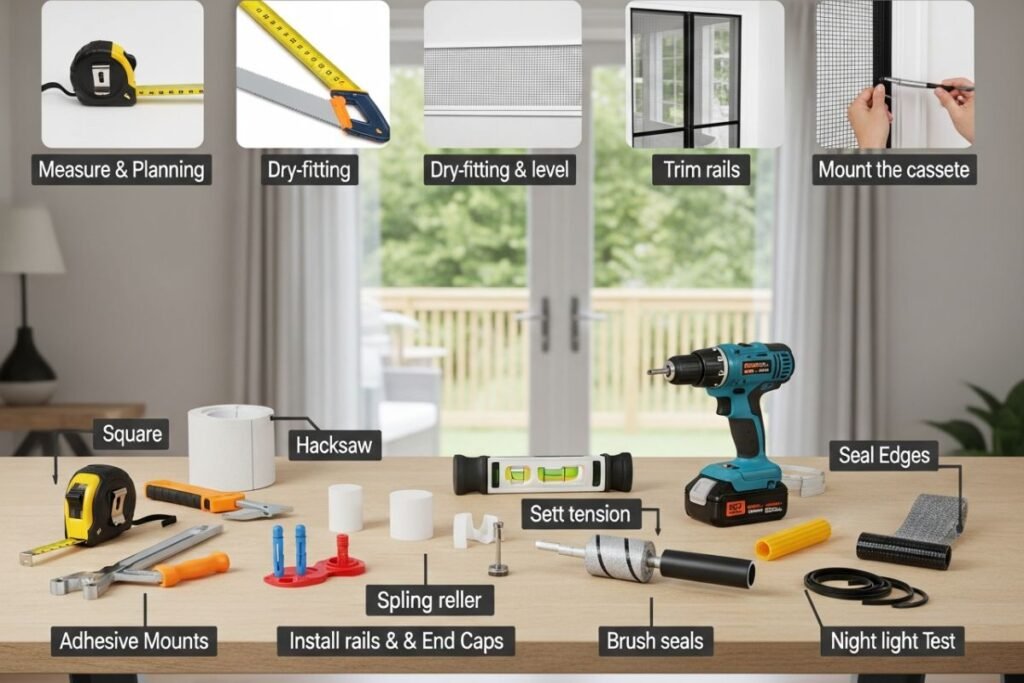
It’s a window screen that rolls up when you want it and rolls back into a self-contained box, eliminating the need to ever take your window screen out and store it elsewhere.
Tools & Materials
Tape measure, square, hacksaw, drill with anchors or adhesive mounts, level, spline roller, brush seals.
Step 1: Measure & Plan
Take the interior reveal width and height in three spots (W/H) and record the manufacturer’s size tolerances to prevent the sash from hitting the handle.
Step 2: Dry-Fit Level
Once the cassette and guide rails are installed, use a spirit level to verify that everything is straight and there is no rubbing or finger retraction.
Step 3: Trim Rails
Cut the rails to length and deburr the ends so the mesh slides freely without catching.
Step 4: Mount the Cassette
Install the cassette with anchors or the adhesive included with the kit. Tighten the screws just enough to ensure you achieve your final alignment, then finish tightening.
Step 5: Thread Mesh & Set Tension
After all, simply feeding the mesh into the track and adjusting the spring tension just so will ensure your screen remains taut yet retracts with ease.
Step 6: Install Rails & End Caps
Attach the rails, snap on the end caps, and cycle the screen up and down a few times to ensure smooth operation.
Step 7: Seal the Edges
Add brush seals where the mesh meets the sill and jamb to seal up micro-gaps around hardware and in corners.
Step 8: Night Light Test
Set up a lamp outside and turn off the room lights; any light leak represents a potential entry point. You can also tighten the rails or gaskets to achieve a better seal.
How Do You Do the “Light Test” to Seal Every Gap?
At night, set a bright lamp outside the window and turn off lights indoors. From the inside, look for slivers of light around the frame, sash, corners, or hardware; each glint indicates a potential leak. Seal those gaps with EPDM weatherstripping and silicone; use corner keys and brush seals near sliders/handles. Open and close the window, then repeat the test again.
How to Do Maintenance & Troubleshooting?
Quarterly Check
Remove any dust from the mesh using a vacuum, and check for corners, spline and seal lines. By catching slack or small gaps early on, you can avoid having to replace entire panels later.
Re-Adhere Magnets or Velcro
Adhesives may come loose in heat and humidity. Scrub with alcohol, apply heavy pressure and change tired strips that won’t hold your frame in place.
Re-Tension Retractables
There are also instructions in the kit to reset the spring tension if too much slack is created or if the screen has any sag or snaps back too quickly. The mesh and cassette are protected through smooth, controlled retraction.
Pet-Proof the Lower Section
Replace the bottom third with a PET-resistant or stainless steel screen, or install a low kick panel. This prevents the claw damage but without losing visibility from above.
Frame Care
It is necessary to wipe the aluminum or PVC frames occasionally to avoid oxidation and the buildup of dust. A dirt-free frame allows for better seal compression and longer hardware life.
FAQs
Install fine-mesh screens (≥20×20; 30×30 for midges), seal gaps, repair tears, and manage light/airflow. For Euro windows, use retractable, clip-in, or magnetic screens inside the reveal.
Often optional; most homes retrofit retractable cassettes, clip-in frames, or magnetic kits.
Retractable for the cleanest look; magnetic/clip-in for no-drill installs. Use a mesh size of≥20×20 (or 30×30, where midges are common).
Mount magnetic, hinged, or retractable screens inside the reveal and seal around handles/hinges.
Not through intact 20×20+ mesh; most get in via tears or frame gaps.